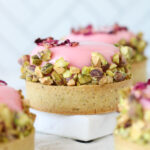
Pistachio, Rose, and Strawberry Tartlet
Pistachio tart shell filled with a pistachio crunch and pistachio creme mousseline, then topped with rose mousse filled with strawberry coulis and covered in a white chocolate mirror glaze.
Servings 6 tartlets
Calories 482kcal
Ingredients
Strawberry Coulis
- 1 tsp unflavored gelatin
- 1 Tbsp cold water
- 400 g fresh strawberries halved
- 75 g sugar
- 1 Tbsp lemon juice
Pistachio Pate Sucree
- 113 g unsalted butter cold and cubed
- 70 g powdered sugar sifted
- 1 egg
- 60 g pistachio flour
- Pinch of salt
- 230 g all purpose flour
Rose Mousse
- 1 tsp unflavored gelatin
- 1 Tbsp cold water
- 1 tsp rose water
- 1 Tbsp sugar
- 2 Tbsps water
- 60 g whole milk
- 50 g ruby chocolate chopped
- 50 g white chocolate chopped
- 125 g heavy cream cold
Pistachio Creme Mousseline
- 250 g whole milk
- 75 g sugar
- 16 g cornstarch
- 1 whole egg
- 2 egg yolks
- 1 vanilla bean or 1 tsp vanilla extract or paste
- 113 g unsalted butter room temperature
- 75 g pistachio paste
Pistachio Crunch
- 50 g sugar
- 50 g pistachios
- 50 g white chocolate chopped
- 25 g feuilletine flakes
White Chocolate Mirror Glaze
- 2 Tbsps unflavored gelatin
- 80 g cold water (6 Tbsps)
- 120 g water
- 175 g sugar
- 165 g condensed milk
- 200 g white chocolate chopped
- 3 drops rose pink gel color
Assembly
- 50 g pistachios chopped
- 1 Tbsp dried rose petals
Instructions
Strawberry Coulis
- Combine the gelatin and water in a small bowl. Mix well to ensure there are no lumps. Set aside to bloom.
- In a medium saucepan, combine the strawberries, sugar, and lemon juice. Cook on a medium low heat for several minutes to prevent the sugar from burning. Gradually increase the heat to medium high.
- Bring the mixture just to a boil, then reduce the heat to medium. Stir constantly and continue to simmer for about 15 minutes. The mixture should be thickened, most of the strawberries should be mush, and it should be glossy.
- Use an immersion blender or food processor to puree the strawberry mixture until smooth. Pour throw a sieve into a bowl. Push all of the liquid and juices out of the sieve, discard the pulp.
- Add the bloomed gelatin to the hot strawberry sauce. Stir until the gelatin has melted completely. At this point, the mixture should be warm, but not very hot.
- Place a 1.5" silicone half sphere mold on a tray and make sure there is a flat surface in your freezer where you can fit the tray and mold. Pour the strawberry mixture (a measuring cup with a spout helps) into the mold, filling each nearly to the top.
- Place the mold in the freezer to set for 2 hours.You can move on to the pistachio pate sucree now, or wait until later. The coulis can stay in the freezer for up to a week. Simply wrap the mold up once they are solid to avoid freezer burn.
Pistachio Pate Sucree
- Add the butter and sugar to the bowl of a stand mixer. Beat on a medium low speed until smooth.
- Scrape the bowl down and add the egg. Mix on a low speed just until the egg starts to incorporate, but is not fully combined.
- Scrape the bowl down. Add the pistachio flour and salt to the stand mixer. Beat on a medium low speed until fully incorporated. Scrape the bowl down.
- Add the flour and beat on low until only just combined. A few streaks of flour okay. If needed, finish mixing the dough by hand with a spatula.
- Divide the dough into two equal portions. Wrap them in cling wrap and chill in the fridge for 10- 15 minutes.
- Place one portion of dough in between two sheets or parchment paper. Roll the dough out to 2mm (1/16 in), or slightly thinner. Place the dough (still between the paper) flat in the freezer. Repeat this step with the other portion of dough.
- Freeze the two dough sheets for 20- 30 minutes.
- Preheat the oven to 315℉. Line a baking sheet with a silicone mat.
- Take out one portion of the frozen dough out of the freezer and remove the top layer of the paper. Use a tart ring to cut out 5 circles. With the help of a small offset spatula, remove each circle of dough from the parchment paper and line a tart ring on the prepared baking sheet.
- Gently press any dough scraps together, wrap in cling wrap, and chill in the fridge. Place the baking sheet in the fridge while you work with the next portion of dough.
- Take out the second portion of the frozen dough out of the freezer and remove the top layer of the paper. Cut the dough into strips that are long enough to line the tart rings (about 10 inches) and wide enough to be taller than the tart ring (about 1 inch).
- Take the baking sheet with the tart rings out of the fridge. Working quickly and carefully, use a small offset spatula to remove a strip of dough from the paper and line the inside of the tart ring. Gently press the two pieces of dough together to seal the seam together.
- Gently press any dough scraps together, wrap in cling wrap, and chill in the fridge. Place the baking sheet back in the fridge for 10 minutes.
- Double check that the tart dough is adhered to the sides of the tart ring and the seam is sealed. Use a sharp knife to trim off the excess dough that extends above the ring. Gently press any dough scraps together, wrap in cling wrap, and chill in the fridge.
- Use a fork to poke a bunch of small holes in the bottom of the tart. This will prevent the tart shell from puffing up when they bake.
- Place the baking sheet in the fridge again for 15 minutes.
- Bake until a light golden brown, about 30 minutes. If your dough ended up thinner than mine, you could need as little as 20 minutes, and if it's thicker it could take 35 minutes. Keep an eye on the tart shells.
- Once baked, cool 15 minutes before removing the tart rings. Transfer to a cooling rack to cool completely. If not using within the hour, place the tart shells in an airtight container for up to a day before filling.
Rose Mousse
- Do not begin this step until the strawberry coulis inserts are frozen solid. Check by popping one out of the mold. If it comes out easily, you are good to proceed with the mousse.
- Place a stone shaped silicone mold on a small tray that will fit in the freezer. This tray will take the same flat area the coulis is currently taking up in the freezer, so no need to make more space.
- Combine the gelatin and cold water and ensure there are no lumps. Set aside to bloom.
- In a small saucepan, combine the rose water, sugar and 2 tablespoons of water. Stir and place over medium heat. Boil for about 2 minutes. You want the sugar to dissolve, but you don't want it to caramelize.
- Add the whole milk to the saucepan and bring back to a boil.
- Meanwhile, place the white and ruby chocolate in a heatproof bowl. When ready, pour the hot milk mixture over the chocolate. Let the mixture sit for about 30 seconds, then whisk until the chocolate has melted completely. Set aside for now.
- In a separate bowl, whip the heavy cream to soft peaks with a whisk or electric hand mixer. If you want a stronger rose flavor, you could add a half teaspoon more here, but it is not necessary.
- Fold the chocolate mixture and whipped cream together. There should be no streaks left. Pour the mousse into a large piping bag.
- Snip a half inch off the bottom of the piping bag and fill the stone mold most of the way full. Take a strawberry coulis insert out of the freezer and gently press the rounded side into the mousse. Pipe more mousse over the insert to cover it completely. Repeat with the remaining mousse and coulis inserts. Smooth the tops of the mold with a small spatula when you're finished.(You will only have enough mousse for 6 or 7 molds, so don't fill them all at once.)
- Chill in the freezer for at least 2 hours, but up to 3 days at the most.
Pistachio Creme Mousseline
- Place the milk in a saucepan over medium heat and bring just to a boil.(If using a vanilla bean, split and scrape out the seeds. Add it with the milk. If using extract or paste, we'll add the vanilla later.)
- Meanwhile, in a heat proof bowl, whisk together the sugar and cornstarch until well combined. When the milk is nearly at a boil, add the egg and egg yolks to the sugar mixture. Whisk until well combined.
- Pour the hot milk into the sugar and egg mixture a little at a time, whisking constantly, to temper the eggs. Once all of the milk has been added and well combined, pour the mixture back into the saucepan.
- Cook the custard over a medium- low heat, stirring constantly until thickened and it hits 175℉ - 180℉.
- Pour the mixture through a sieve into a bowl. Stir in the vanilla (if using extract or paste), then press cling wrap onto the surface of the custard. Cool to room temperature, then cover and place in the fridge until set (or overnight).
- Take the set custard out of the fridge about 30 minutes to an hour before continuing the recipe.
- Add the butter to the bowl of a stand mixer and beat on a medium- speed until light and fluffy. Scrape the bowl down as needed.
- Add the custard to the stand mixer and beat until well combined. Scrape the bowl down.
- Add the pistachio paste to the mixture and beat until smooth and well combined. Scrape the bowl down as needed.
- Pour the pistachio creme mousseline into a bowl, cover, and chill until needed.
Pistachio Crunch
- Before making the caramel, make sure your work area is prepared. Have a silicone mat on a baking sheet on the counter ready for you to pour the molten caramel on top.
- Place the sugar in a small saucepan over medium heat. Once the edges of the sugar start to melt, use a spatula to gently pull in the edges of the sugar so that it melts and caramelizes evenly. Continue to cook and stir until you have a rich golden shade.
- Immediately remove from the heat and stir in the pistachios so they are coated with the caramel. Pour the nuts and caramel mixture onto the silicone baking mat. Let it cool completely.
- Transfer the hardened pistachio praline chunks to a food processor. Blend until you have a paste. This will take 7- 10 minutes. Scrape the bowl down as needed. You can go for a slightly chunkier consistency if you want.
- Microwave the white chocolate until completely melted. About 30- 45 seconds on half power. Stop and stir every 20 seconds to prevent burning. Combine the pistachio paste mixture with the melted white chocolate and stir until well incorporated.
- Add the feuilletine flakes and gently fold together. Store this pistachio crunch mixture in a covered container at room temperature until ready to assemble the tarts.
White Chocolate Mirror Glaze
- Do not begin this step until the rose mousse stones are frozen solid. Check by popping one out of the mold. If it comes out easily, you are good to proceed with the glaze.(Note: Mine did not pop out of the molds cleanly, even after days in the freezer. It is a bit tricky.)
- In a small bowl, combine the gelatin with the cold water (80g or 6 Tbsps) and stir until there are no lumps. Set aside to bloom.
- In a saucepan, combine the water (120g), sugar, and condensed milk. Place over medium heat and bring to a bare simmer. Do not boil.
- Remove the pan from the heat and stir in the bloomed gelatin. Mix well so that all of the gelatin dissolves.
- Place the white chocolate in a heatproof bowl. Pour the hot milk mixture through a sieve and into the bowl. Let the chocolate and hot liquid sit for 30 seconds. Stir until well combined and the chocolate is completely melted.
- Add the rose pink gel color and stir to combine. Add more color if you prefer a darker pink.
- Transfer the glaze to a measuring cup with a spout or a paper/ plastic cup that you can easily use to pour the glaze. Let the glaze cool about 20- 30 minutes, or until it is between 90℉ - 93℉. It should feel lukewarm. The consistency will be thick, but still runny.
Mirror Glaze Application
- Cover a baking sheet with plastic wrap to catch the drips. Place 5 small cups or bowl upside down on the covered sheet.
- Leave the mousse in the freezer until you are ready to glaze and work with one mousse stone at a time to prevent melting. Have a flat tray or plate ready to transfer the glazed mousse stones later.
- Pop a mousse stone out of the molds and place on one of the upside down cups on the baking sheet. Hold the container of glaze a few inches above the mousse stone and begin pouring onto the center of the round. Spiral the glaze out towards the edge of the stone. Allow the excess to drip off. If there are any areas that need more glaze, go back and add a little more.
- Once the glaze has stopped dripping and is no longer running, use a small offset spatula or knife to tidy up the drips hanging off the edge of the stone.
- Repeat with the remaining mousse stones. Carefully transfer the glazed mousse to a flat plate or tray and place in the fridge while you immediately move on to assembling the tartlets.
Assembly
- Take a pistachio tartlet shell and spoon a thin layer of the pistachio crunch mixture into the bottom. Spread into an even layer.
- Place the pistachio creme mousseline in a piping bag and snip the bottom half inch of the bag off. Fill the tart shell the rest of the way with the mousseline. If desired, you can smooth off the top with an offset spatula.
- With a small offset spatula, carefully transfer a glazed mousse stone onto the center of the mousseline filled tartlet.
- Gently press chopped pistachios onto the side of the glazed stone. This will cover up any imperfections and conceal the creme mousseline underneath.
- Top the glazed mousse with a few dried rose petals.
- Repeat this process with all of the tartlets. Place them in the fridge to thaw for 20- 30 minutes before serving.
Notes
- You will have extras for most of the elements in this recipe. If you double the mousse portion, you may have enough to make 12 complete tartlets.
- Please read through the entire blog post for detailed notes.
- You should be able to make about 6 or 7 tartlets.