
How to Make Croissants for the First Time


If you want to learn how to make croissants for the first time, the first step is the easiest. Take a deep breath. Now, just give it a go. Croissants are a delicious French pastry featuring layer upon light layer of buttery pastry dough. You can fill them with all sorts of tasty ingredients like chocolate or almond paste. They’re tough, but you got this!
This page contains affiliate links which means I may earn a commission if you use them. I only recommend tools that I use and trust.
Jump to Recipe
Croissants are the BEST
I have always loved croissants, and who doesn’t? They are impossibly light and airy and the perfect accompaniment to a cup of coffee. I’ve always wanted to learn how to make croissants, but for the longest time, I never entertained the idea seriously. This is a difficult recipe to master and my experience with pastry is limited.

This month, I’ve decided to start tackling pastry. I’ve been putting it off for too long and finally got a kick in the butt to step outside my comfort zone. Last week I made cream puffs because choux pastry was a great recipe to dip my toes into the pastry world. Apparently, I decided to skip ahead to the finish line and figure out how to make croissants.
How to Make Croissants
Croissants are made by laminating dough and butter. As you bake the croissants, the butter will melt, leaving behind gorgeous layers of flaky pastry. In theory. The tricky bit is you can’t let the butter melt until it is time to bake. That means you are layering dough with cold butter that you must flatten and roll out several times. You can skip arms today, because this will give you a workout.
Making the Dough
You will make a simple yeast dough, shape it and then place it in the fridge to chill. I know what you’re thinking. “Cold + Yeast = Bad” True, but this recipe is going to take you 2 days to complete and you don’t want that yeast to be activated until it is time to bake. When you make the dough, be sure to hold onto your mixer. That thing will dance all over your counter if you take your hands off.

Go ahead and shape your dough on a silicone baking mat so that you can easily transfer it to and from your baking sheet. The dough is super sticky, so be sure to flour the mat first. If you need to, use your bench scraper to help you move the dough. It’s very important to shape the dough according to the measurements in the recipe. Get out your tape measure to make life way easier.
Print Recipe
The Butter Slab
Your dough is going to be taking a 4 hour nap in the fridge, so don’t begin this step until about 30 minutes before your dough is ready. The butter will need to chill for just 30 minutes before you begin laminating. If you let it chill any longer it will become too hard to work with. The dough takes a lot longer to firm up, which is why it gets a 4 hour rest.

Traditionally, you’ll see bakers bashing sticks of butter into a slab between two pieces of parchment. The recipe I used from Sally’s Baking Addiction decided to take a different path. Instead, beat softened butter and a smidge of flour together and spread it into the necessary dimensions. Then, chill this slab until it is firm, but pliable. The added flour helps prevent the butter from leaking too much when you bake. And shaping soft butter? Waaayy easier than bashing cold sticks, but not actually as easy as I thought.
Again, you must be precise with your measurements. I shaped my butter mixture on a silicone baking mat, but I think it would be even easier to draw the rectangle on a piece of parchment, flip it over, and then fill in the space with butter. Ultimately, it’s up to you. The butter needs to be exactly 7×10 inches so that it fits perfectly into your shaped dough. You can always trim the edges of the chilled butter later.
Time to Laminate
Laminating is when we wrap the butter in a blanket of dough and roll it out nice and big. Then, we fold the dough into thirds, like folding up a letter, turn it 90° and place it back in the fridge to chill out again. That doesn’t sound so bad, right?

I found the first roll out to be the most difficult because the dough and butter are super duper cold. Flour your surface well and lay out your dough. Make sure it is rolled out to the appropriate size before you add the butter slab on top. If the butter is wider than the dough, trim off the excess. Fold the dough around the butter and pinch the edges to seal it.
Jump to Recipe
Use your rolling pin to firmly smash down the dough, then firmly roll it out to a 10×20 inch rectangle. I had a lot of air bubbles appear when I did this. If you see a bubble, make a hole to let the air out, then pinch and reseal the dough. We don’t want any butter to be exposed!
Book Turn
Once the dough is rolled out, we’re doing the book turn. Fold the top third of the dough down. Now fold the bottom third up and over the dough. Turn the bundle so that the short end is now facing you. Congratulations! You’ve just finished your first of three turns. Transfer your dough to a lightly floured baking mat on a baking sheet. Let your dough and butter chill out in the fridge for 30 minutes to firm back up.

For the second turn, place the dough upside down onto your lightly floured counter top. By inverting the bundle with every turn, you will create more even layers in the finished croissants. Again, roll the dough out with the short end facing you. Do a book turn, rotate the dough and chill for another 30 minutes. You’ll repeat this process one more time.
Chill, Shape, and Fill the Croissants
The finished croissant dough is going to rest for 4 hours in the fridge, or overnight even. When you’re ready, take the dough out and roll to a 10×30 inch rectangle. Cut the dough in half horizontally, then cut each half into 4 squares. This will give you 8 even squares. Work with one square at a time and place the others in the fridge. You don’t want the butter to melt!

Plain Croissants
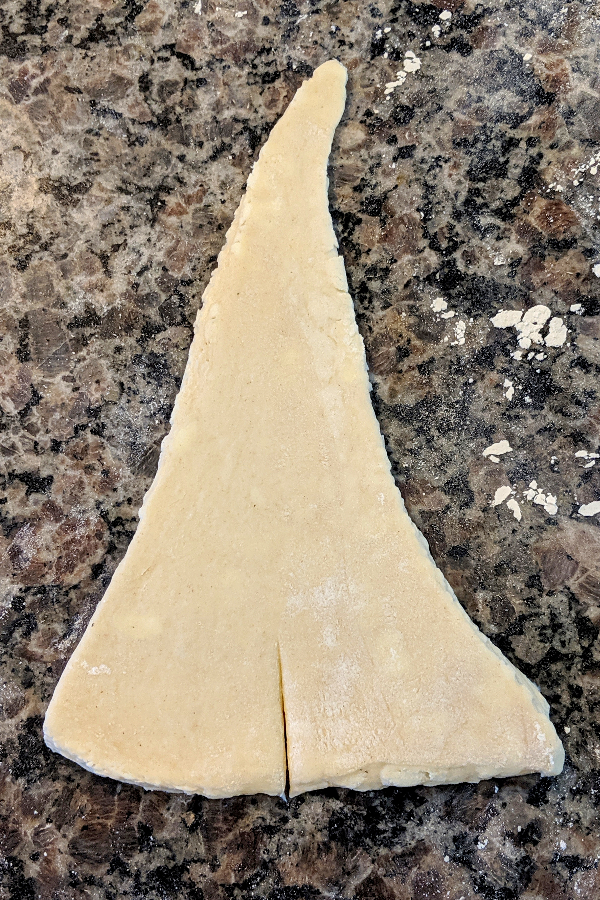
To make a traditional, plain croissant, cut one square in half diagonally to make two triangles. Working with one triangle at a time, pull and roll the dough until it is about 8 inches long. Try to make sure the base is even on both sides. Cut a slit in the base and roll up the triangle into the classic croissant. Place on the prepared baking sheet and pull the ends in to form a crescent.
Almond Croissants
A fantastic reader of mine suggested that I make almond croissants. I’ve been wanting to learn how to make croissants for awhile, but I never realized almond croissants had a filling! Silly me thought they just had some almonds on top. I decided to use the almond paste from this recipe from Simply Home Cooked.

You shape almond croissants the same way as plain ones. But once you have that big triangle, drop in a tablespoon of paste and form a little nugget. Now roll it up! Once they come out of the oven, water down the leftover paste with some milk and place another tablespoon on top of the rolls and sprinkle with sliced almonds. Bake for an additional 5- 7 minutes. Dust with powdered sugar before serving.
Print Recipe
Chocolate Croissants
Chocolate croissants, or pain au chocolat, will always be my favorite variety. For one, chocolate. Am I right? For two, I have a special memory associated with them. The very first time I drove by myself was because my mom asked me to go get her a chocolate croissant from Panera. I really didn’t want to because it was snowing (okay, flurrying, but it felt like a blizzard!) and I’m a giant baby. But I did it and I was so proud of myself!
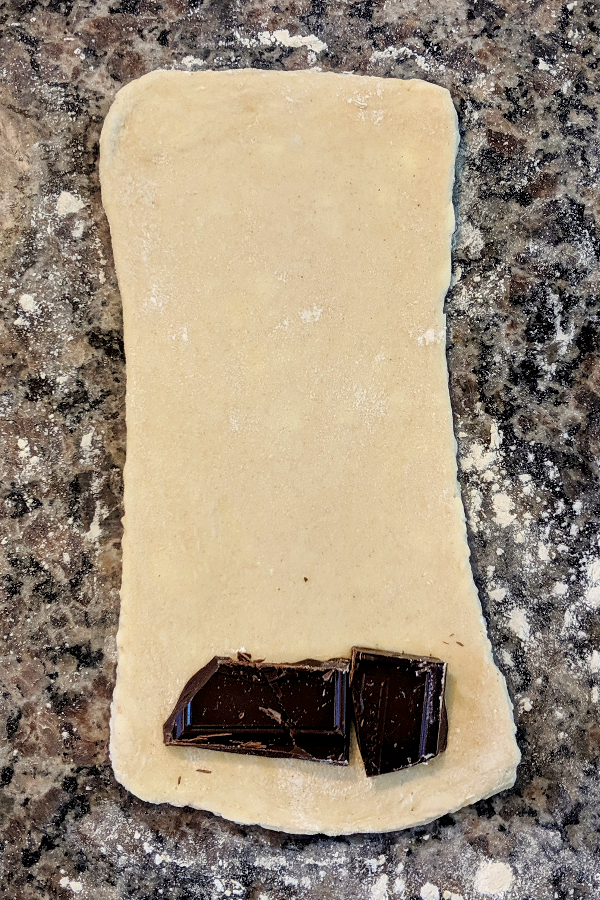
Anyways… I think chocolate croissants are the easiest to make because they are a different shape. Take one of your squares and cut it down the center to create two rectangles. Roll and pull it into a 4×8 inch rectangle. Place chopped up chocolate at one end and just roll it on up. Suuuuper easy!
Getting Ready to Bake
Now that you’ve got your baking sheets full of shaped croissants, cover them in cling wrap and let them sit for 30 minutes at room temperature. This is going to let the yeast finally get to work, without letting the butter melt. After the 30 minutes, place the baking sheets into the fridge for 1- 2 hours to get the butter and dough nice and cold again. Cold dough and butter will help minimize leakage and spreading. Before you pop them in the oven, give them a nice egg wash.

I liked working with the croissants one baking sheet at a time. Once I prepared the first tray, I set a timer for 30 minutes and continued on to the next baking sheet’s worth of croissants. Then I set a separate timer for this second tray. That bit of a delay between baking sheets meant I could easily bake one tray at a time and felt no pressure to overload the oven like I did with the cream puffs.
Jump to Recipe
Blunders
I’ve been wanting to learn how to make croissants for years and I’m proud of my first try. They definitely aren’t perfect, but I learned so much from what went wrong. Plus, they still taste crazy good. Can’t complain about that! In the future, there are a handful of tips I would keep in mind.
Tips For Next Time
More Flour
My biggest and first mistake was not flouring my work area well enough. This made my sticky dough become a hot mess and ended up exposing a lot of butter. I just sprinkled a good bit of flour over these bare patches, but the damage was done. Exposed butter means leaking during baking and you lose a lot of the layers and lightness.

Next time, I will prepare my work surface better. But be advised, you don’t want your dough to become too dry either. Before you fold up your dough, always brush away excess flour so that the dough will adhere to itself and create gorgeous layers.
Better Measurements
While I was quite precise about measuring my dough, I was a bit lax about measuring my butter. I thought that a slightly smaller sized butter slab would be easier to wrap up with the dough. In reality, I think this created more air bubbles and made the dough more uneven when I rolled it out. Next time, I will use my rectangle on parchment paper method and see how that goes.
Shaping the Dough
I found it very difficult to shape the croissants into a triangle. One side was always super long and the other was super short. Other recipes have you cut out the exact shape of the croissant with equal sides and a long point. The recipe from Simply Home Cooked has great pictures to show you this alternative style. Next time, this is the method I’m going to try.

Lower and Longer
The original recipe had me baking the croissants for 20 minutes at 400℉. In my opinion, this browned the outside too much, while the inside was not baked as thoroughly as I would prefer. Next time, I plan on baking these at 375℉ for 30 minutes, rotating the baking sheet halfway through.
Extra Help
Phew! This is a LONG post! And yet, there’s so much I could still say about how to make croissants. These pastries are tough, so I suggest reading several recipes to get a feel for the technique. Definitely check out Sally’s Baking Addiction and Simply Home Cooked for more information and a different take on how to make croissants. Sally has a great video and a ton of step by step pictures.

Flavortown
Now that I know how to make croissants, I can’t wait to try out a bunch of different flavors. Besides trying chocolate and almond again, I’m also thinking about cherry pie cruffins, ham and cheese, nutella, cajeta, and brie and fig jam. What flavor would you like to see? Leave me a comment!
Print Recipe
You Got This
The hardest part about learning how to make croissants is actually getting over the hesitation and making them. It’s a project. This recipe is going to take you two days, but 90% of that time is down time, so it’s actually not as labor intensive as I expected. Just do it! Make the croissants, learn from your mistakes, and enjoy your delicious blunders.

How to Make Croissants
Croissants are my favorite pastry and can go sweet or savory. Now that you know how to make croissants, you can whip up a batch whenever you find the time. Have fun expanding your baking skills and experimenting with new flavors! But if you’re feeling pastry, just not the effort, try out my Puff Pastry Breakfast Pockets.

Croissants
Ingredients
Dough
- 1/4 cup unsalted butter softened and cut into 4 pieces
- 2 tsps salt
- 4 cups all- purpose flour
- 1/4 cup sugar
- 1 pkg instant yeast
- 1 1/2 cups whole milk cold
Butter Slab
- 1 1/2 cups unsalted butter softened
- 2 Tbsps all- purpose flour
Egg Wash
- 1 egg
- 2 Tbsps whole milk
Chocolate Variation
- 2- 4 oz semi-sweet chocolate roughly chopped
Almond Variation
- 1/2 egg or 1 egg white
- 1/4 cup unsalted butter softened
- 1/4 tsp almond extract
- 1 1/4 cup almond flour
- 3/4 cup powdered sugar plus more for dusting
- 1/2 tsp cornstarch
- 1- 2 Tbsps whole milk
- sliced almonds
Instructions
Make the Dough
- In the bowl of your stand mixer, add butter, salt, flour, sugar, and yeast in that order. With a dough hook attachment, stir the mixture for 1 minute on a low- medium speed. With the mixer running, add the cold milk in a slow, but steady, stream. Once the milk has been added, bump the speed up to a medium- high speed and knead for 5- 7 minutes. Hold onto your mixer so that it doesn't fall off your counter! The dough is done when it pulls away from the bowl and doesn't stick to your fingers when you poke it.
- Lightly flour a silicone baking mat or parchment paper on a baking sheet. Use your lightly floured hands to shape the dough into a ball and place on the prepared sheet. Gently flatten the dough a bit and cover with cling wrap. Place the baking sheet in the fridge to chill for 30 minutes, no more.
- Take the baking sheet out of the fridge. Pull the silicone mat (or parchment paper) onto the counter where you will be rolling a shaping the dough. Lift up the dough, using a bench scraper if it is too sticky, and lightly flour the surface. Roll and shape the dough into a 10x14 inch rectangle. The dough will resist this shape, so stop regularly and use your hands to shape the edges into sharp corners. Transfer the silicone mat (or parchment paper) back onto the baking sheet and cover the dough with cling wrap. Chill for 4 hours, or overnight.
Make the Butter Slab
- Begin this step 30 minutes before you are ready to take the dough out of the fridge. Place the butter and flour in the bowl of your stand mixer and mix on low until thoroughly combined. Dump the butter mixture onto a silicone baking mat or parchment paper on a baking sheet and use an offset spatula to shape it into a 7x10 inch rectangle. Be precise! If using parchment paper, draw the shape on the reverse side to make this super easy. Place the baking sheet in the fridge to chill for 30 minutes, no more.
Laminating
- Remove the dough and butter slab from the fridge. The butter should be firm, but pliable. If it is too hard, let it rest on the counter for a 2- 5 minutes, but leave the dough in the fridge. Transfer the dough onto a lightly floured counter. Place the butter slab on the dough, lining it up to fit precisely in the center. If the butter is too wide, trim the edges and place the trimming in the center of the butter. Fold the top of the dough down and the bottom up and over the butter. Seal this seam and the edges. The butter should be completely enclosed in dough.
- Make sure the dough is not sticking to the counter at this point. Add more flour underneath and around the work area if necessary. Roll the dough to a 10x20 inch rectangle. The butter will be thick and cold, so this will require some elbow grease. Use the rolling pin to beat down the butter/ dough and then roll out. Again, use your hands regularly to get sharp edges and corners. Once you have the right size, brush away the excess flour and fold the top third of the dough down and the bottom third up, like folding a business letter. Turn the dough 90°. That's the first turn. Transfer the dough back to the lightly floured silicone mat (or parchment paper) on a baking sheet and cover with cling wrap. Place baking sheet in the fridge to chill for 30 minutes, no more.
- Take your baking sheet out of the fridge and invert the dough onto your lightly floured counter with the short end facing you with the seam side down. Roll the dough out to another 10x20 inch rectangle. Regularly use your hands to get sharp edges and corners and make sure the dough is not sticking to the counter. Once you have the right dimensions, brush off the excess flour. Fold the top third down and the bottom third up. Rotate 90° and transfer to the lightly floured baking sheet (or parchment paper) on a baking sheet. That's the second turn. Cover in cling wrap and chill for 30 minutes, no more.
- Repeat the previous step to complete the third turn. Cover with cling wrap and place in the fridge. Chill for 4 hours, or overnight.
Shape the Croissants
- Take the dough out of the fridge and transfer to a lightly floured counter. Roll the dough to an 8x20 inch rectangle, making sure the dough is not sticking. Use your hands to get sharp edges and corners. With a pizza cutter, slice the dough in half horizontally, then cut each half into 4 equal squares. You will end up with a total of 8 equal squares. Work with one square at a time, placing the rest in the fridge on a baking sheet.
Plain Croissants
- To make a classic croissant, cut one of the squares diagonally, giving you two triangles. Gently press and roll the dough into an 8 inch V shaped triangle. Cut a slit, about 1 inch long, in the base of the dough and roll it up. Place the croissant on a baking sheet lined with a silicone mat or parchment paper. Turn the ends of the croissant in, creating a crescent shape.
Chocolate Croissants
- Slice a square down the center to create two rectangles. Gently roll and pull the dough to be a 4x8 inch rectangle. Place some chopped chocolate on the short end near you and roll it up. Place the croissant on a baking sheet lined with a silicone mat or parchment paper.
Almond Croissants
- Beat the butter, egg, and almond extract. Add the almond flour, powdered sugar, and cornstarch. Beat until combined. Set aside to shape the dough.
- Form the classic croissant shape described under "Plain Croissants". Before you roll it up, place a tablespoon of the almond paste at the base. Form it into a log and roll the croissant up as normal.
- Add 1-2 tablespoons of milk to the remaining paste to thin it out a bit. Once the croissants are done baking, top the almond croissants with a tablespoon of the thinned out paste and some sliced almonds. Bake for an additional 5- 7 minutes. Dust with powdered sugar before serving.
Bake the Croissants
- Cover the shaped croissants with cling wrap and let them sit at room temperature for 30 minutes. Then transfer them to the fridge for 1- 2 hours.
- Preheat the oven to 375°F.
- Whisk the egg wash together and lightly brush the tops of the croissants.
- Bake for 25- 30 minutes, rotating the baking sheet halfway through. Monitor the croissants during the second half of baking to make sure they don't become too dark.
- Allow to cool for several minutes on a wire rack before serving.
Congratulations!
- Pat yourself on the back. You just made delicious, flaky croissants!
Notes
- If butter comes through the dough when you're laminating, dust liberally with flour.
- Each turn becomes easier to roll out.
- To get half an egg, crack an egg and measure it's weight in ml. Whisk it lightly and measure out half of the original weight. If you want to make all of the croissants almond, double the almond paste recipe.
- I suggest baking one tray of croissants at a time.
- Nutritional information is for plain croissants only.
My Favorite Products For This Recipe
Colleen
Hi there! I’m Colleen, a novice baker with a passion for learning and improving my bakes… and blunders. On Bakes and Blunders, you can find all sorts of tasty recipes that range in difficulty, but most importantly, I’ll try to explain the reason behind important steps. If you know why a recipe works, you can tweak and adapt it to suit your unique tastes, and you’ll be able to reliably produce some very delicious treats. If you love baking and want to expand and grow your skills, or if you are a casual baker and just need some pointers, my blog is right up your alley! Join me on my baking journey and we’ll learn how to make more impressive recipes together.


2 Comments
Morgan
Croissants are a FAVORITE of mine, but I’ve never even thought of making them myself because they seemed far outside my abilities. This breakdown of the techniques and troubleshooting has given me confidence, though! I’m going to give these a try when my mom comes through town, because she’d love some homemade croissants over breakfast.
PS – I’ve also heard that you can make almond croissants with leftover plain ones. That’s how bakers in France get a second life out of the plain croissants that are a day or two old: cutting them open and baking them with an almond glaze softens the croissants back up and gets them as good as new! I tried it once and got a soggy mess (it definitely works to soften up a stale croissant,) so that’s also on my list of things to try again…afetr I make my own plain croissants with this recipe!
Colleen
Great tip! I had no idea that you could turn plain croissants into almond ones. Those almond ones were really good. My husband wasn’t interested, but he ended up eating the very last (well, it was just a half) almond croissant. And he said he really regrets not trying them sooner.