
Oreo Cake with Black Cocoa Buttercream


Have you ever tried black cocoa before? Well, hold onto your boots! Because we’re going to slather black cocoa frosting all over some Oreo cakes to make this fun mini tiered solar system cake. It’s the perfect birthday cake for a kid enthralled with the wonders of planets, space, and Oreos.
This page contains affiliate links which means I may earn a commission as an Amazon Associate (or other affiliate program) from qualifying purchases. I only recommend products that I use and trust.
Black Cocoa Buttercream
Okay, normally I’d dive into a little story or chat you up about the cake, but this frosting demands to be front and center. If you’ve never tried black cocoa before, it tastes like the cookie part of an Oreo! I’m not even messing with you a bit!

Black cocoa is a very alkaline chocolate that tastes much less chocolate than the other cocoa powders. So if you want a deep, intense chocolate treat, this is not the cocoa for you. It’s more about adding color, and in this case we’re vibin’ with the Oreo flavor.
I even made a vegan black cocoa frosting a few months ago when I made this vegan tiger stripe smash cake. You can find the recipe for it in the description box of the video. It’s a smaller batch, but you can always double it.

How to Get BLACK Buttercream
Using black cocoa makes it crazy easy to get midnight black buttercream without a ton of food coloring. While I used 15 drops of the black diamond gel by Chefmaster, I honestly think I could have done less. But let me tell you about my process…
Once your buttercream is made, it’s time to get our color on. I like to add my gel color 5 drops at a time, then mix to combine. After you’ve added 5- 10 drops, remove about a cup of frosting and pop it in the microwave for 5- 10 seconds. The heat will deepen the color, but you don’t want to cook the buttercream.

Beat the warm frosting back into the rest of the batch. If you feel you want it darker, you can add up to 5 more drops of gel. Cover the buttercream and let it sit for an hour. Now it should be just about as dark as you need it. And when you use it on your cakes and cupcakes, the color will deepen even further.

Okay, We Can Talk About Cake Now
Have we all calmed down? That black cocoa buttercream is the bomb dot com, but this Oreo cake is pretty bangin’ too. Basically, I took my white almond cake, swapped in some vanilla and added some crushed up Oreos. Boom. Done.

I used 11 whole Oreos and bashed them up in a bag with a rolling pin. You could probably use a food processor, but I wanted to make sure I had some decent sized chunks. And you could use a few more cookies if you really wanted. Or a few less, but like, why?
Serving Size
With this recipe, I was able to make two 6 inch layers, two 4 inch layers, and 10 cupcakes. That’s a LOT of batter. You could easily make a three or four layer 6 inch cake or more than 24 cupcakes.

If you’re curious about adapting bake times to different cake pans, you should definitely check out my Bake Times chart in the Resource Library. All of the tools in there, and there’s over a dozen, are completely free to my email subscribers.
Related Reading: How to Design a Cake with Cake Templates
Top Tips for Cakes
- Make sure all of your ingredients are at room temperature. This will help everything blend nicely and give your cakes a nice texture.
- Scrape down your bowl often. Butter and sugar can hide out at the bottom of your bowl. Make sure everything gets blended!
- Do NOT over mix. Once you add the wet and dry ingredients, keep the speed on stir and only mix to combine.
- Wilton baking strips will give you a flat top and prevent the edges from caramelizing.
- Use an electronic scale to divide your cake batter into the pans.
Story Time
Even though we’re almost done, Imma throw in a quick story (I can’t help it, after all). I designed this cake with my Cake Sketch Book months ago, but Ben has been fascinated by space for years now!
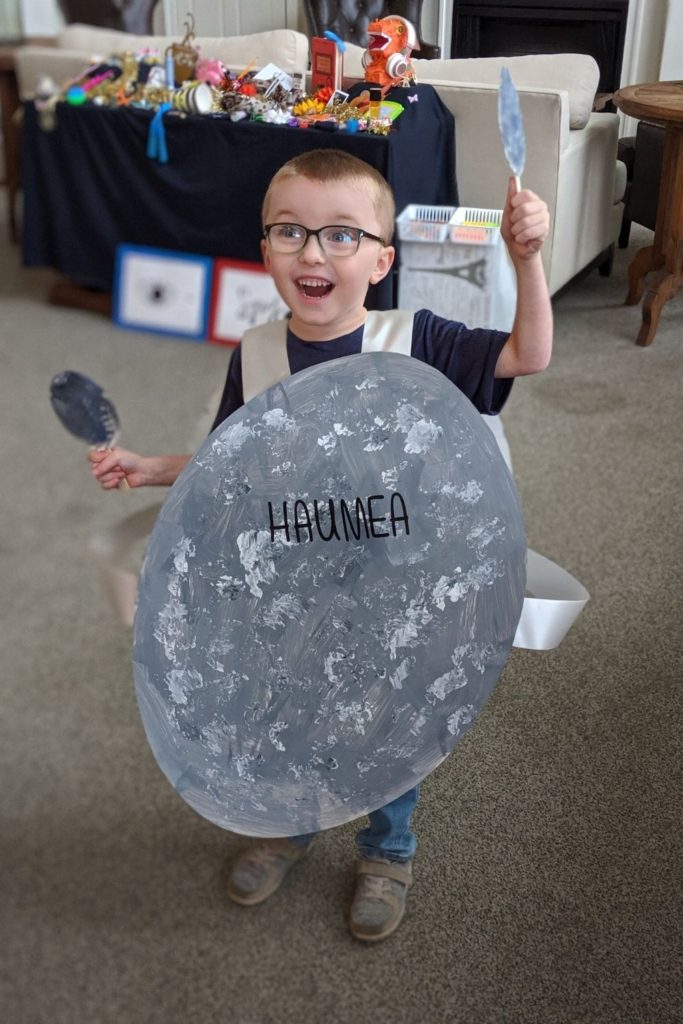
This kid knows more about space than I do, and probably more than the average adult. For Halloween one year, he wanted to dress up as Haumea. So I made him a Haumea costume, complete with its moons Hi’iaka and Namaka. He even won 2nd prize in a costume contest!

Wafer Paper Planets
But anyways, to make the solar system cake, I decided to use wafer paper. Anna Astashkina is a super talented wafer paper artist, and I’ve learned so many tips and tricks from her videos, so I felt up to the challenge.
I made you a step by step video for each of the planets (and the sun). Basically, I painted the wafer paper with a mix of glycerin, water, and gel color. Once they dried, I stamped them out with different sized hole punches.
It’s easy to make the planets in advance and then add them to the cake whenever you’re ready. They did okay in the fridge afterwards, but after a day or two, they had curled a bit more and were slightly darker where they touched the cake.
Enjoy!
Are you super excited to dig into this Oreo cake covered in black cocoa buttercream? ‘Cause I sure as heck am! In fact, this ended up being one of my top 3 favorite cakes of all time. This is an easy solar system cake that you can make for the space junkie in your life.

If you get a chance to try this recipe, please, please, please leave a comment to let me know what you think! I absolutely love hearing about it anytime someone tries one of my recipes. Happy Baking!

Oreo Cake with Black Cocoa Buttercream
Ingredients
Oreo Cake
- 14 oz all- purpose flour
- 2 1/2 tsps baking powder
- 1/2 tsp salt
- 10 fl oz milk room temperature
- 2 fl oz canola oil
- 2 tsps vanilla
- 8 oz unsalted butter softened
- 14 oz sugar
- 6 egg whites room temperature
- 4 oz Oreo cookies (11 whole cookies) crushed
Black Cocoa Buttercream
- 1 lb unsalted butter room temperature
- 4 oz black cocoa sifted
- 28 oz powdered sugar sifted
- 1 tsp vanilla extract
- 5- 7 Tbsps cream
- Pinch of salt
- 10- 15 drops black food gel
Instructions
Oreo Cake
- Preheat the oven to 350°F, spray your cake pans (two 4 inch and two 6 inch) with Baker's Joy, and line with parchment rounds. Wrap with wet baking strips, if using. Set aside.
- In a medium bowl, sift together the flour, baking powder, and salt. Set aside. In a measuring glass, combine the milk, oil, and vanilla. Set aside.
- Beat the butter and sugar on a medium speed until light and fluffy, about 5 minutes, scraping the bowl down as needed.
- Add the egg whites two at a time, more or less, mixing until combined after each addition. Scrape down the bowl as needed.
- Add 1/3 of the dry ingredients to the mixer and beat on low until just combined. Add half of the liquids and beat until just combined. Repeat with another third of the dry ingredients, the remainder of the liquids, and finally the remainder of the dry, beating until almost combined. Scrape down the bowl as needed.
- Gently fold in the crushed Oreos. Be careful not to over mix the batter, but you do want the cookie pieces evenly distributed.
- Fill the 4 inch pans with 6 oz of batter and the 6 inch pans with 14 oz of batter. Bake the 4 inch pans for 30- 33 minutes and the 6 inch pans for 35- 38 minutes. The cakes should be golden brown, spring back when touched, and a skewer should come out clean.
- Cool cakes in their pans for 10 minutes before transferring to a cooling rack. Cool completely before frosting.
Black Cocoa Buttercream
- Beat the butter on medium speed until pale and fluffy, about 5 minutes. Scrape the bowl down as needed. Meanwhile, sift together the black cocoa powder and the powdered sugar.
- Add a third of the cocoa/ sugar mixture and the vanilla to the bowl. Beat on low until combined, then on medium until creamy, about 1- 2 minutes. Scrape the bowl down.
- Add another third of the sugar/ cocoa mixture to the bowl. Beat on low until combined, then on medium until creamy, about 1- 2 minutes. Scrape the bowl down.
- Add the remaining sugar/ cocoa mixture and a pinch of salt to the bowl. Beat on low until combined, then on medium until creamy, about 1- 2 minutes. Scrape the bowl down.
- Add 4 tablespoons of cream and beat to combine. If the buttercream is still too thick, add cream a little bit at a time, beating between additions, until the frosting reaches the right consistency.
- Add 5 drops of black food gel and beat to combine. If your frosting is still too gray, add 5 more drops and beat to combine. Remove a scant cup of frosting and microwave for 5- 10 seconds. It should be loose and melty, but not cooked. Beat that back into the buttercream to deepen the color.
- Let the buttercream sit, covered, at room temperature for 1 hour. If you are still not happy with the color, add 5 more drops. The color will deepen when you frost the cake.
Notes
- You will have enough batter to make about 10 cupcakes as well. Bake them for 20 minutes.
- This recipe makes plenty of frosting! I was able to fill and frost the mini tiered cake as well as the cupcakes.
My Favorite Products for this Recipe
Colleen
Hi there! I’m Colleen, a novice baker with a passion for learning and improving my bakes… and blunders. On Bakes and Blunders, you can find all sorts of tasty recipes that range in difficulty, but most importantly, I’ll try to explain the reason behind important steps. If you know why a recipe works, you can tweak and adapt it to suit your unique tastes, and you’ll be able to reliably produce some very delicious treats. If you love baking and want to expand and grow your skills, or if you are a casual baker and just need some pointers, my blog is right up your alley! Join me on my baking journey and we’ll learn how to make more impressive recipes together.


You May Also Like

Number Cake with Chocolate Joconde

Chocolate Rosemary Cake
