Make Cream Cheese Danishes From Scratch


Who doesn’t love digging into delicious cream cheese danishes topped with cherry or apricot fruit filling? Those flaky, buttery layers of pastry dough, sweet cream cheese filling, and gooey fruit topping make danishes the best part of any brunch spread. Making a tasty danish from scratch is no easy feat, but it is so worth the effort.
This page contains affiliate links which means I may earn a commission as an Amazon Associate (or other affiliate program) from qualifying purchases. I only recommend products that I use and trust.
Jump to Recipe
Laminated Dough
Danishes are pure bliss in a bite, but they take a few days to make and are a very technical recipe. The biggest difficulty is making the laminated dough. Laminated dough is when you “fold” cold butter into a bread dough. When the dough bakes, the butter melts and gives you a light, flaky texture.
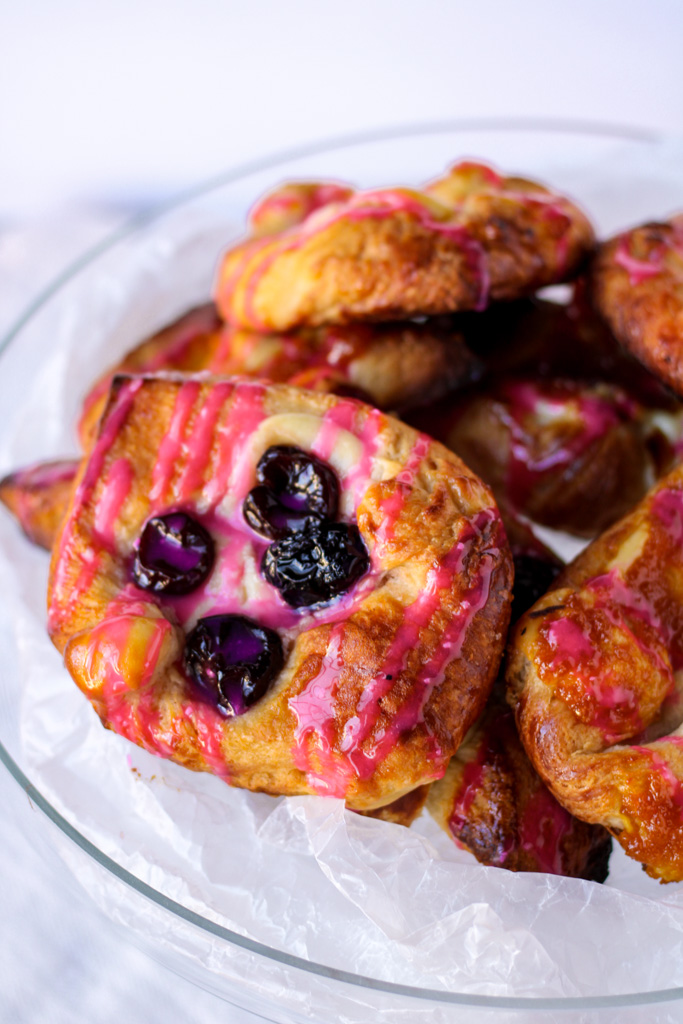
Danish pastry dough is one type of laminated dough, but not my first rodeo with this type of bake. Last summer I made croissants for the first time. I’ve also made rough puff pastry from scratch, which is kinda like a shortcut method of laminating dough.
Make the Fillings
Every single element of this recipe was made from scratch. That includes all of the fillings. Personally, I feel that apricot and cherry are the BEST flavors for a cream cheese danish. But you’re allowed to like a different flavor (I guess…).

The apricot filling was super quick and easy. The cherry filling was just fine, but I think my cherry pie filling might have worked better. I suggest making the fruit fillings a day before the dough. Just store them covered in the fridge.
Print Recipe
This cream cheese filling is pretty simple to make. I made the mixture right before I shaped the danishes so that I wouldn’t have to worry about storing it. You can adjust the sugar slightly to suit your taste.
Danish Pastry Dough
Once you’ve made your dough and set it in the fridge to ferment, the real work begins. Shape your butter into a 4×5” rectangle. It helps to do this on some wax paper so that you can easily move it. Place it in the fridge to chill until the dough is ready.
Take the dough out and roll it into a 5×11” rectangle. Do your very best to keep the shape with sharp corners so that you get the best lamination. I like to use scrapers to pat my dough into shape. Now place the cold butter on one side and fold the dough over and seal the sides. The dough should just cover the butter.
Book Fold
Roll the dough out to a 6×12” rectangle. Again, do your very best to keep those sharp corners. It’s time to do the first book fold. Brush off the excess flour and fold the bottom third of the dough up. Then fold the top third down. Rotate the dough 90°, cover with cling wrap, and chill for 30- 40 minutes.
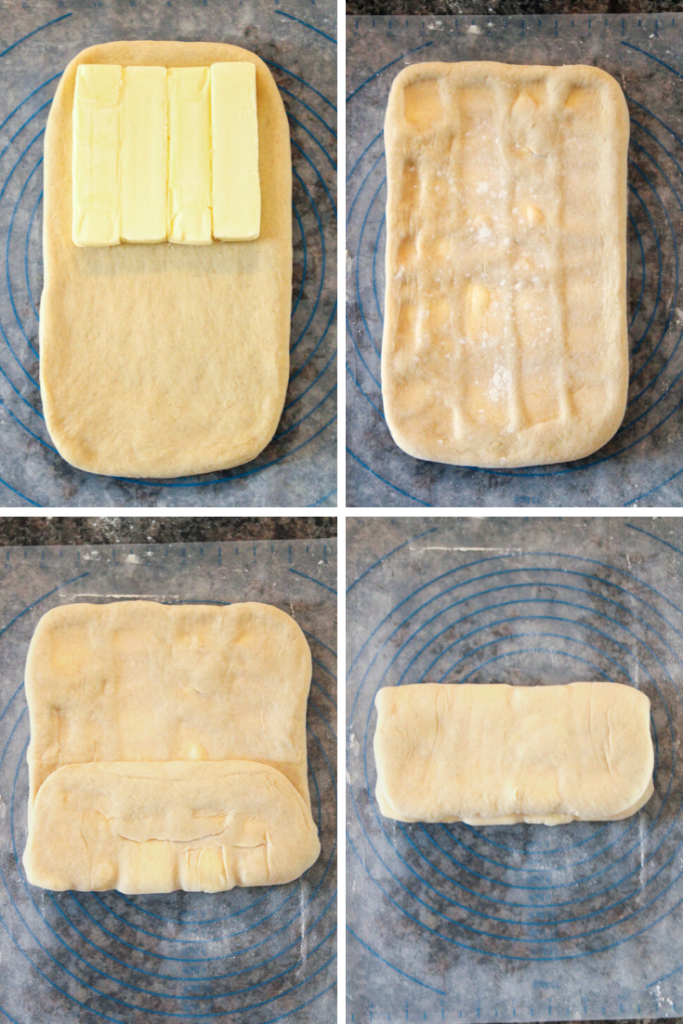
That’s the first book fold, aka the first turn. You’re going to complete this a total of 6 times. The first one is the trickiest because the butter isn’t broken up yet. By the end, the dough will be much easier to work with.
Related Reading: I Applied to The Great American Baking Show
It’s important to keep the dough and butter cold so that you get those layers when you bake. My house always seems to get warm when I need it to be cold (even with the AC on), so I chilled my dough after each fold. If your counter and kitchen are quite cold, you might be able to get two folds done before you need to chill.
How to Make & Shape Danishes
After your dough has chilled overnight, you are ready to bake those danishes! Roll the dough out into a large rectangle about ¼”- ⅛” thin, again trying to keep sharp corners. Cut the dough into 3- 4” squares and shape.

To make a fruit basket, pull the corners into the center of the danish. To make a pinwheel, cut slits from each corner towards the center of the danish, but not all the way. You’ll have 4 triangles attached at the center. Pull one side of each triangle to the center. Pipe a dollop of cream cheese filling into the centers and top with fruit filling.
Jump to Recipe
Tips & Tricks for Perfect Danishes
When adding the cherries, just add the cherries and no syrup. If the syrup gets under the danish, it will burn while baking. However, if the syrup is thick enough, it won’t leak.
To make your danishes look extra sharp, you can trim the edges of the danishes before shaping. I like to use a pizza cutter and a ruler for those sharp edges. This is totes optional though. And don’t worry, I’ve got a way to use up those scraps!
Keeping Your Danishes Moist
As soon as the danishes come out of the oven, brush with a simple syrup. This will keep the danish moist and add a lovely shine to your pastry. My fillings also looked dry and a bit meh after baking, but the syrup made them look pretty again.
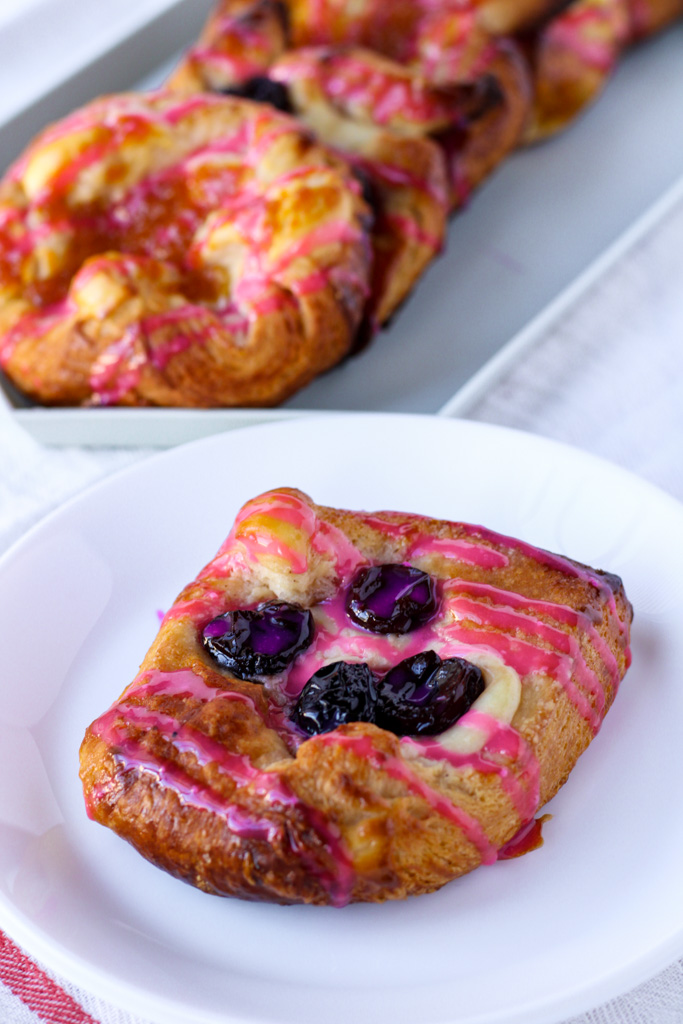
Once the danishes are cool, drizzle with a fondant glaze. To make the fondant glaze, place the crumbled up fondant in a saucepan with the water. Heat gently and stir to break up the fondant. If it’s too thin, add more water until it’s a nice drizzling consistency. Mine still had fondant chunks, so I strained those out before drizzling.
Print Recipe
Blunders
This dough was not nearly as cooperative as the croissants or rough puff pastry. I think my biggest issue was that I may have added too much flour. You want the dough to be cohesive and tacky, but not sticky. It’s always better to use less flour if you’re in doubt.

I also had a big problem with shrinkage while I rolled out the dough. It was difficult to get sharp corners, and even after rolling it out to the proper size, it would shrink up a bit. My first few danishes were waaay too thick. Luckily, they still baked fine and tasted great!
Extras Mean Danish Cupcakes
Since I trimmed the edges of my dough, I had scraps of that and a good bit of leftover cream cheese mixture and fruit filling. I hate wasting tasty scraps, so I pressed the scraps into the bottom of my silicone muffin pan and topped with the cream cheese mixture and fruit.

I baked these for 20 minutes and they were firm, but the bottoms weren’t browned. So I placed them on a baking sheet, tented them with foil and baked for about 10 more minutes. Ben and I are calling these Danish Cupcakes!
Related Reading: Swedish Saffranskrans is a Magical Holiday Bread
Enjoy!
Phew! Did you make these? Congratulations! Laminated dough is tough stuff, but digging into a cherry cream cheese danish that you made from scratch is true happiness. Ben and I decided to try one to get a bite shot, but we couldn’t stop eating it!

If you liked this recipe and have a passion for baking, consider subscribing to Bakes & Blunders. You’ll get access to my baking library full of free resources, plus you’ll never miss a recipe. That’s a win-win in my book!

Cream Cheese Danishes with Cherry & Apricot Fillings
Ingredients
Apricot Filling
- 4 oz dried apricots
- 8 oz orange juice
- 3 oz sugar
- Pinch of salt
- 1 oz unsalted butter
Cherry Filling
- 12 oz frozen sweet cherries
- 3 oz sugar
- 2 tsps cornstarch
- 2 tsps water
Simple Syrup
- 4 oz sugar
- 4 oz water
Cream Cheese Filling
- 8 oz cream cheese softened
- 1 oz sugar
- 1 egg
- 1 tsp vanilla
- 1/4 tsp lemon zest
- 1 oz cake flour sifted
Fondant Glaze
- 3 oz fondant
- 1- 2 oz water
Danish Pastry Dough
- 5 oz bread flour
- 5 oz all- purpose flour
- 1 pkt instant yeast
- 2 oz sugar
- 2 oz warm water
- 2 oz milk scalded and cooled slightly
- 1 egg
- 1/2 tsp salt
- 1/2 tsp vanilla
- 1/4 tsp cinnamon
- 2 Tbsps unsalted butter melted
- 1/2 lb unsalted butter cold (2 sticks)
Egg Wash
- 1 egg beaten
Instructions
Apricot Filling
- Place the dried apricots and juice in a small saucepan over med/ med- low heat. Cover and simmer for 25 minutes or until the apricots are nice and soft.
- Add the sugar and salt and stir gently until they have dissolved. Add the butter and remove the pan from the heat. Stir until the butter has melted completely.
- Use an immersion blender to puree the mixture, or transfer the mix to a food processor or blender and puree. Store in an air tight container in the fridge until needed.
Cherry Filling
- Defrost the cherries and strain the juice. Add enough water to the juice to have 3 oz of liquid. Add the juice and sugar to a small saucepan and bring the mix to a boil.
- While the juice mixture heats up, combine the cornstarch and water in a small bowl. Add this slurry to the boiling juice mixture. Whisk until the mixture has thickened nicely.
- Remove the pan from the heat and stir in the cherries. Store the mixture in an air tight container in the fridge until needed.
Simple Syrup
- Heat the sugar and water over medium heat and bring it to a boil. The sugar should be completely dissolved. Store the syrup in an air tight container in the fridge until needed.
Cream Cheese Filling
- Beat the cream cheese and sugar on low until smooth. If you prefer a sweeter mixture, you can add an extra half ounce of sugar.
- Add the egg, vanilla, and lemon zest. Beat on low until combined. Gently fold in the flour until the mixture is well combined.
Fondant Glaze
- Break the fondant up into small pieces and place in a small saucepan with an ounce of water. Place the pan over low heat and gently stir the mixture until the fondant is dissolved. If the mixture is too thick, add water a tiny bit at a time.
Danish Pastry Dough
- Combine the two flours and measure out 6 oz of the mixture into a larger bowl. To this larger bowl, add the yeast, sugar, water, milk, egg, salt, vanilla, cinnamon, and melted butter. Stir gently until the mixture forms a shaggy dough. Add flour from the remaining flour mixture a bit at a time until the dough cleans the sides of the bowl. Do NOT add any more than necessary!
- Turn the dough onto a lightly floured surface and knead until you have a smooth dough, only 2- 3 minutes. Add flour if necessary, but you want a smooth, slightly tacky dough. We can always add more flour later.
- Place the dough into a lightly floured bowl, cover, and place in the fridge for 1- 1 ½ hours. While the dough chills, prepare the butter. Place the butter in between two pieces of parchment or wax paper and beat with a rolling pin to soften slightly. Shape the butter into a 4x5" rectangle. Place in the fridge until needed.
Laminate the Dough
- Take the dough out of the fridge and roll into a 5x11" rectangle. Try to keep your corners sharp. Place the butter slab on the dough and fold the dough over it, pinching the sides to seal the butter in. The butter should only just fit inside the dough. There shouldn't be a lot of extra space.
- Roll the dough out to a 6x12" rectangle, keeping your corners as sharp as possible. Brush excess flour off of the dough. With the length of the dough facing away from you, fold the bottom third of the dough up. Brush off the excess flour. Fold the top third of the dough down. Rotate the dough 90°, cover in cling wrap and chill in the fridge for 30- 60 minutes.
- This is your first book turn. Complete 5 more book turns for a total of 6 turns. Then let your dough rest in the fridge overnight, or at least for 4 hours.
Shape and Assemble
- Roll the dough out into a thin rectangle (¼"- ⅛" thick) about 7 inches wide. Cut the dough in half lengthwise so you have two long rectangles roughly 3 ½ inches wide. Slice those rectangles into squares. You should end up with 8- 12 squares of pastry dough.
- Shape the squares into fruit baskets or pinwheels (read post for instructions), place onto a prepared baking sheet, and brush the edges with an egg wash. Pipe a bit of cream cheese filling into the center and top with either cherries or a dollop of the apricot puree.
- Cover the baking sheet with cling wrap and set aside to proof for 30 minutes. Meanwhile, preheat the oven to 400°F.
- Bake the danishes for 18- 20 minutes or until a deep golden brown. As soon as they come out of the oven, brush with the simple syrup. Transfer to a cooling rack. Once cool, drizzle with the fondant glaze.°
Notes
- I found that the tips of the pinwheels burn easily, so I prefer the fruit basket shape.
- To prevent an overly dark bottom, next time I plan on baking at 400F for 5 minutes, then at 350F for 15 minutes.
My Favorite Products for this Recipe

Colleen
Hi there! I’m Colleen, a novice baker with a passion for learning and improving my bakes… and blunders. On Bakes and Blunders, you can find all sorts of tasty recipes that range in difficulty, but most importantly, I’ll try to explain the reason behind important steps. If you know why a recipe works, you can tweak and adapt it to suit your unique tastes, and you’ll be able to reliably produce some very delicious treats. If you love baking and want to expand and grow your skills, or if you are a casual baker and just need some pointers, my blog is right up your alley! Join me on my baking journey and we’ll learn how to make more impressive recipes together.


You May Also Like

Scandinavian Baking: Cardamom Coffee Braid

Classic Irish Soda Bread Recipe